Learn GoCheck Kids
The Importance Of Vision Screening
The Centers For Disease Control And Prevention (CDC) reports that “vision disability is the single most prevalent disabling condition among children.”1
Early vision screening is integral to a child’s early health and development, especially in regards to the prevention and treatment of amblyopia, the #1 cause of preventable vision loss in children.2
Regular vision screening assessments in early childhood reduce the risk of persistent amblyopia at 7 years of age by more than 50%.3
However, fewer than 30% of children receive adequate vision screening even though the technology is readily available.4

What is Amblyopia?
Amblyopia is decreased vision in one or both eyes due to abnormal development of vision in infancy or childhood. If not treated early it causes permanent vision loss.
3 Types of Refractive Errors Causing Refractive Amblyopia
- Myopia – Nearsightedness
- Hyperopia – Farsightedness
- Anisometropia – Difference in prescription between eyes

AAP Recommendations
Annual instrument based photoscreening is recommended from ages 1 to 5 or until visual acuity can be assessed directly.
Visual acuity testing is recommended beginning at age 4.

Photoscreening vs. Visual Acuity
Photoscreening evaluates the eye and detects risk factors invisible on physical exam. It is objective and does not require a response from the child.
Visual Acuity tests the brains ability to process visual stimuli. It is subjective and requires comprehension of the test.
What Is Photoscreening?
Photoscreening is a pediatric vision screening technique wherein a camera is used to determine refractive errors and identify risk factors for amblyopia. A photoscreener detects amblyopic risk factors such as hyperopia, myopia, and anisometropia and measures their severity.
How To Start Screening Using GoCheck Kids
- Power the device on. Select the GoCheck Kids App on the home screen.
- Enter your email address and password. If you have a passcode set up, you will be logged in automatically.
- You will be directed to the patient queue. This is where you can select patients already scheduled and search for patients who have been screened previously.
- Simply click on the patients name to begin a photoscreening or visual acuity test.
- If the patient’s record has not been added yet, select the “add” button in the top right corner of the screen.
Setup Your Device Passcode
GoCheck Kids requires all devices to be passcode protected. In order to access the app, you must have your passcode turned on.
- Go to your device settings
- Select “Touch ID & Passcode”
- Select “Turn Passcode On”

Some Tips for Lighting
As you’re getting comfortable using your GoCheck Kids device, here are a few things to keep in mind.
Photoscreening requires dim, indirect lighting so the patient’s pupils will naturally dilate.
To assist you in capturing a quality image quickly, the app contains a lighting gauge on the image acquisition screen. This gauge will assist you in determining the proper light level for photoscreening. Bright light will not allow the user to take the image, nor will an environment where the lighting is too dark.
In dim lighting conditions, you will want to ensure that there is no direct light on the patient’s eyes coming from any ceilings, hallways, windows, overhead lights, etc. This is to minimize extraneous reflections on the cornea that can create false results. Direct light sources in the patient’s view can also prevent the patient’s pupils from fully dilating.
If the room has windows, adjust room lighting by ensuring the blinds or shades are closed, turn off the overhead lights, diminish any extraneous light sources in the room (e.g. desk lamp, monitors, etc.), and use the room door to control the amount of light coming in.
If the room has exterior windows, depending on how much light comes through the blinds or shades, you may be able to close the room door and turn off the lights. For example, if it is not too bright or too dark with lights off and door shut, then you can continue screening. However, if it is too dark, you can use the door to allow some indirect light into the room.
Should you not want to use the door to control the amount of light coming in (and would prefer to have the door completely closed), if the room is too dark, you can use a dim, indirect light source within the room such as a dimmable lamp or a battery operated closet tap light positioned behind the user.

How To Add Or Edit A Patient
- Navigate to the patient queue on the mobile device.
- Click on the “Add” button in the top right corner.
- There are three required fields: First Name, Last Name and Date of Birth. All other information is optional.
- Select “Done”. Patients added on the mobile device are automatically scheduled to be screened that day.
- The patient will then be added to the patient queue, where you can select their record to begin screening.
- To change a patient’s record, select the patient and hit “Edit” in the top right corner.
For desktop or bulk options, see the videos.
How To Take A Quality Image
ENSURE PROPER LIGHTING
Find a place that is dimly lit with little light from windows to conduct your tests. Select the photoscreening test. Turn off the overhead lights and control lighting by opening the door until the indicator turns green. Uneven lighting across the face will cause a not gradable result, as will overhead lighting from the hallways.
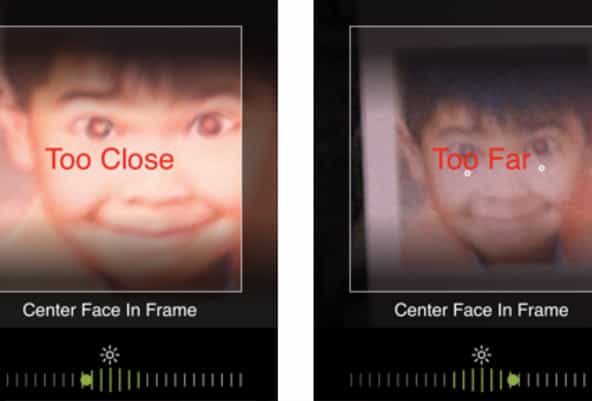
ENSURE PROPER TEST DISTANCE OF 40 INCHES
Stand at arms length from the child and ensure the face is inside the box. White dots will track the pupils. Slowly back up, away from the child, until the distance gauge is within the proper range. Animal noises to capture the child’s attention can be toggled on and off using the speaker icon on the upper right of the screening window. Multiple toggles also allow you to cycle through the sounds. Can’t hear anything? Please check the hardware mute toggle on the left side of the phone above the volume buttons.
CAPTURE A QUALITY IMAGE
When the lighting and test distance are within the acceptable range, the box on the screen will turn green. Hold steady and take the picture. Sometimes it is hard to remain steady enough to get a good result. Holding your arms and hands closer to your body will help stabilize the image.
REVIEW THE IMAGE
Make sure the child is looking directly at the camera – if not, retake the image. Make sure the image is centered and in focus.
What To Watch Out For
Gaze
When the child looks away from the device, it can potentially create a false positive. The user must review every image to ensure it is of quality when deciding to press retake versus accept.

If the child is not looking, press ‘retake’ and try again.
Spurious Reflections
Sometimes this happens when the room is not dim enough and an overhead light or nearby window/monitor causes the extra reflection. If this happens, position the patients so they face away from the light source and or try adjusting your lighting environment.

Eyelid Blocking Pupil
Sometimes children smile too big which causes them to squint their eyes thus obstructing the pupils. Ensure the child opens their eyes as wide as they can to capture everything going on in the eye.

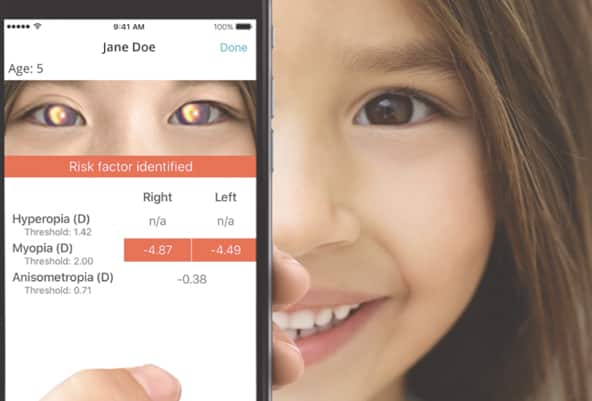
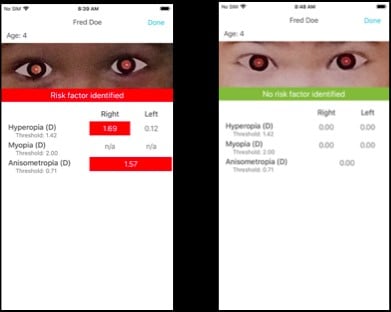
How To Interpret The Results
Once you take the picture, results are displayed immediately.
“Risk Factors Identified”: means that the child should be referred for a comprehensive eye exam with a pediatric eye care professional.
“No Risk Factors Identified”: means that the child does not have significant risk factors at this visit. They should be rescreened again next year.
The following risk factors are measured:
- Hyperopia (farsightedness)
- Myopia (nearsightedness)
- Anisometropia (difference in prescription between eyes)
- Ocular Misalignment (Misalignment between the two eyes)
If any of the three risk factors exceed the AAPOS guidelines for referral criteria, risk factors will be identified.
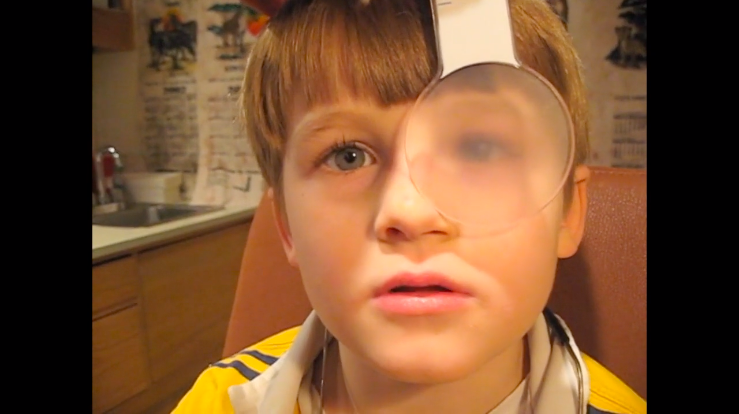
How To Perform a Cover Test
How To Export The Results
Via Mobile Device
Once the screening is completed, the results will automatically be uploaded to the portal.
Click “Fax” button to send the result to the fax machine according to the number you have configured in your portal.
If your EHR has an eFax option, this is a good way to get the results to your EHR.
You can also click the “Print” button: this allows you to print the results using an Airprint compatible printer.
Via Online Portal
Click “My Patients” and search for the patient you would like results for.
Click on the patient to bring up the patient’s record.
Click on the screening you would like to export or print.
You have three options in the upper right corner: Fax, PDF, and Print.
Select the option you would like to use to export the results.
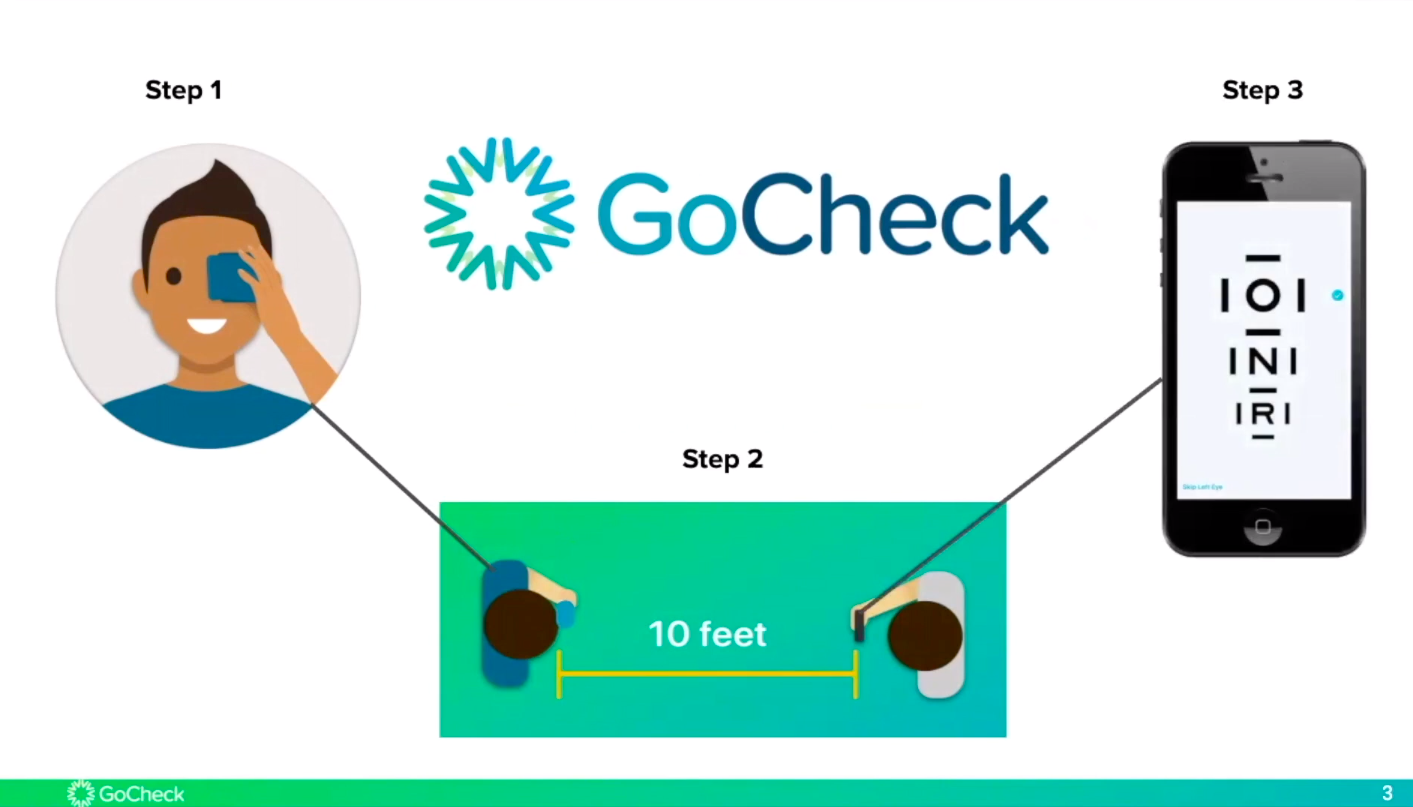
GoCheck Visual Acuity
The determination of whether a child has risk factors or not are based on the recommendations set forth by the American Association for Pediatric Ophthalmology and Strabismus.
First, the test is administered at 10 feet from the child. Be certain the distance is maintained exactly throughout the test. If the child leans forward or takes a small step back, the test could be off as much as 20%.
When testing each eye, an occlusive patch is the best way to test to avoid false positives or false negatives.
Ask the child to read the letters inside the crowding bars from top to bottom. Remember the patient’s response and record the response on the device screen. Tap one for the correct response and tap twice for the incorrect response.
“No Risk Factors Identified” means that the child does not have significant risk factors at this visit and should be re-screened again next year.
“Risk Factors Identified” means that the child has missed too many letters for their age and should be referred for a comprehensive eye exam.
GoCheck Kids Practice Admin Capabilities
If you are locked out of your account, notify your clinics GoCheck Kids Practice Administrator to unlock it for you. This will ensure you avoid disruptions to your work flow due to down time.
The Practice Admin is the one who can manage your clinics user's and account. (e.g. add, edit, unlock, deactivate)

How To Add A User To The Portal
- Log into the portal and click on “My Practice”.
- Select the “Add Practice Member” tab at the top of the page.
- Add a First Name, Last Name and Unique Email Address.
- If you have multiple locations, specify a location for the user.
- The “role” will default to “user” unless adding a Practice Manager
- If you’d like to designate the user as a provider, click the checkbox that says “Is Provider”.
- Schedule or send registration email now.
How To Unlock An Account
- Select “My Practice” from your patient portal menu on the left hand side
- Search for the practice member who is locked out of their account
- Highlight their name then select/click the yellow notepad and pencil on the right to edit their account
- Select the green “Edit” button
- Uncheck the box next to account locked
- Select the green “Save” button


How To Reset Your Password
- Go to www.portal.gocheckkids.com
- Select “Forgot Password”
- Enter in the email associated with your Gocheck Kids Portal
- Select “Get Reset Link”
- Open password reset email
- Create new password


- What Is Photoscreening?
- How To Start Screening
- Setup Your Device Passcode
- Some Tips for Lighting
- Add Or Edit A Patient
- Take A Quality Image
- What To Watch Out For
- How To Interpret The Results
- How To Perform A Cover Test
- How To Export The Results
- VA In Office
- VA At Home
- Practice Admin Capabilities
- Add A User
- Unlock An Account
- Reset Your Password
- Importance of Vision Screening
- Downloadable Resources